Sunday, February 28, 2016

Export/Import data in Microsoft Dynamics AX RTW using Excel data connector

In my last post I coved Static export to Excel. In this post I will show you Dynamic Export to Excel, Similar to Excel add ins in AX 2012. In this type of Excel, you can do the CRUD operations in Excel and get the results in AX or vice-versa.

In AX7 RTW, this is enabled by using Excel Data Connector App. It uses same Data entities which are used by Data management. Excel Data connector app is based on Apps for office framework that provides JavaScript-based web API for Apps to communicate with office application. The biggest advantage of using this framework is that apps can run inside Excel on premise, Excel online, Excel on the iPad, and other Excel apps in the future.

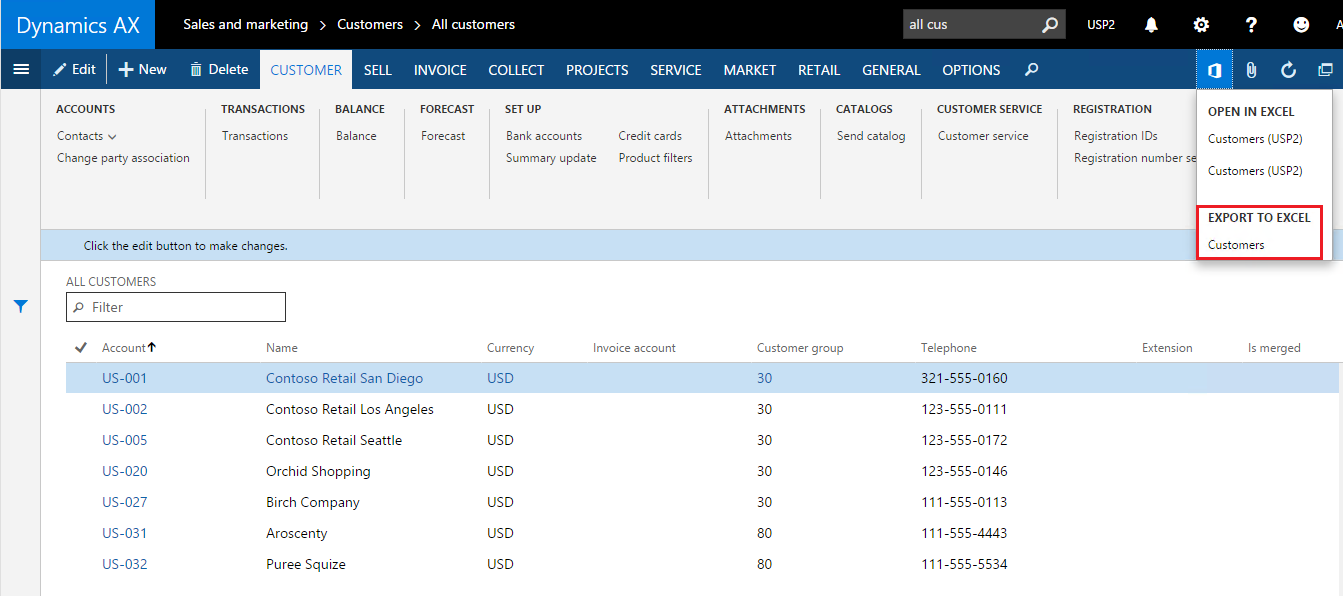
I will take the example of Customers. Navigate to All customers form and click on Open in Excel for customer entity.


As you see in the above screenshot, There are 2 options in Open in Excel. It is because there are 2 data entities defined on the CustTable. The system will look at the root data source for the form and then look for entities that have a matching root data source. All those entities are listed under the Open in Excel menu.  To check this I created a custom data entity named: VINCustDataEntity.


Data entity have given a one base platform for the all communication between AX and outside world which is far better than any previous AX version.

Once I click on the Customers, I get the flyout for download. Click on Download and Excel sheet will open with data connector app in Excel.


As you can see in above screenshot, Data connector app shows the source entity and field names on top. On bottom following options are show:
New: create a new row.
Refresh: Read the data from AX and update the data in Excel
Publish: Read the data from excel and update the data in AX
Filter: Add/remove any filter on data entity
Design: This option lists all the entities available in AX. Using this entities, fields in excel workbook can be configured.

At the end you have 3 icons for settings, messages center and user menu.

Settings option looks like below:

If you update the data in excel and publish it, AX will be updated with the data in excel. If you get any error while uploading, row with error will be highlighted.




Export to Excel in Microsoft Dynamics AX RTW

In this post I will show, Export to Excel option in Microsoft Dynamics AX RTW.
This option is for static export of the data in Excel file.

I will take the example of all customers. Navigate to All customers from AR module or you can simply search for it in search box.


When I click on the Export, I get the following fly out. I don't have the SharePoint configured. but If you have it configured you can directly save the document to SharePoint.


As you see you have option to download locally, Save it directly to OneDrive for Business or SharePoint.
Once I click on the download, I get the Excel showing all the exported data as follows:


There is another option for export for partial/full data export as follows:

I can choose to export all the rows or marked rows as shown above. I chose to export only marked rows:


Friday, February 26, 2016

Configure your personal Microsoft Dynamics AX

In this post, I will show how to configure your personal Microsoft Dynamics AX system through personalization.

Following screenshot shows the default dashboard:


To do the personalization, Right click on any control, you will get details like form name and control name and option to personalize the control.


Click on the Personalize : control name.


As you can see in the above snapshot,
You can do following:
Change the Label of the control
Hide the control 
Skip in Tab key Sequence.

On bottom there is link for personalize this form. If you click on it, you will get the form personalization toolbar as follow:


  • Select tool: Selects an element to change its properties.
  • Move tool: Move an element to the new location. you can either use arrow keys to move an element or mouse to drag drop an element.
  • Hide/Show tool: Selects an element to toggle the visibility to yes/no. Click on this tool then on an element. After that for each click it toggles the visibility of the element.
  • Summary tool: This is applicable for the elements in Details forms. Selects an element to toggle the visibility in FastTab summary

  • Skip tool: Select an element to toggle whether they are skipped when tabbing
  • Edit tool: Select an element to toggle whether to prevent the editing of them. This is added to disable accidental editing of any field in Edit mode. You cannot edit such elements.
  • Add tool: Add the data field to show on the page. When you click on it and selects the element, Flyout comes from the right to choose the data fields from the form datasource tables.
  • Manage menu: It has 3 options, Clear: to clear the personalization, Import: to Import the XML file of the personalization, Export: to export the personalization XML file.
This personalization file looks like below


There is also an option of "pin to dashboard" on tiles in workspaces. With this option you can see the most important info on the default workspace screen itself and do not have to navigate.


Now we can configure new tiles/list in the workspace as per the requirements.
If you add tile it looks like below:


If you add Simple list it looks like below:


If you add Tabular list, it look like below:


Apart from this, there are user options for preferences


Thursday, February 25, 2016

The New Microsoft Dynamics AX RTW

The new Microsoft Dynamics AX RTW is now available for download at https://connect.microsoft.com/site1321/Downloads/DownloadDetails.aspx?DownloadID=60417 

Wednesday, February 24, 2016

Keybord shortcuts for most frequently used tasks in AX 7

In this post I will cover keyboard shortcuts for most commonly/frequently tasks.
Filtering shortcuts:
Open grid filtering for the current column  -> Ctrl + G
Open advance filtering                                   -> Ctrl + Shift + F3

Grid shortcuts:
Move to the next/previous column            -> Tab / Shift + Tab 
Move to the next/previous row                  -> Down Arrow/ Up Arrow
Go to the next/previous page of data        -> Page Up / Page Down

Form shortcuts:
Create a new record                                 -> Alt+N
Delete a record                                          -> Alt + F9 or Alt + Del
Save record                                                -> Alt+S or Ctrl+S
Revert (restore)                                        -> Ctrl+Shift+F5
Data refresh                                              -> Shift+F5
Toggle edit mode                                     -> F2

Form navigation shortcuts: (Personally these are the most used by me)
Switch to grid view                                   -> Ctrl+Shift+G
Switch to details view                              -> Ctrl+Shift+D
Switch to header view                              -> Ctrl+Shift+H
Switch to lines view                                  -> Ctrl+Shift+L

You can read the full list of shortcuts here.

Monday, February 22, 2016

Export/Import data using data management in AX 7

In this post I will be showing Import/Export using Data management in  AX7. For the purpose of demonstration, I will take example of product categories.

Product categories are defined in AX can be mapped to Retail category, Procurement category, Sales category etc.

Export of product categories:


Navigate to Data management workspace and create a new export project as shown below:


Click on export.
In export screen:
  • Set the name of the project: Product categories (this is similar to processing group in AX 2012)
  • Set Target data format : Excel
  • Entity name: Product categories
Click on Add entity.
New entity(Product categories) will be added to "Selected files and entity section".

Now our entity is ready for export.
Click on the "Export" on in the action pane.


Now you have 2 options to download.
Download package or download file.

Download Package:

If you choose this option 3 files will be downloaded:
Manifest.xml -> defines the entity structure
PackageHeader.xml -> defines the entity header
Product categories.xlsx -> actual data

Download file:

If you choose this option only excel file containing product categories will be downloaded.

Import of Product categories:


We are going to use the same files from export to Import. Navigate to Data management workspace and create a new import project as shown below:


On import screen:
  • Set the name of the project: Product categories import
  • Set data format : Excel
  • Entity name: Product categories
Click on upload and browse to the excel file which we want to import.
New entity(Product categories) will be added to "Selected files and entity section".

Now our entity is ready for import.
Click on the "Import" on in the action pane.


Your import is complete.

I have shown the import using excel, same can be done by using package.


Sunday, February 21, 2016

Extension capabilities of AX 7 (in CTP 8) – Menu


In my last post, I had discussed about extension capabilities of Form. In this post I will cover extension capabilities of Menu.

There are many menu extension examples available in AX7.

I will take example of AccountPayable.workspace.


To demonstrate all the capabilities I have created a new extension of Account Receivable menu : AccountsReceivable.FDDXXXExtension
By default when you create an extension, its name will be <ParentObject.extension>. You can rename it as you want.

You can do the following in the AX 7 menuextensions:

Add new submenu:

I have added new submenu VINSubmenuExample to AccountsReceivable.FDDXXXExtension.


Add new MenuItemReference:

I have added new MenuItemReference VINMenuItemReferernceExample to AccountsReceivable.FDDXXXExtension.


In the properties, you define the Menu Item Type, Menu Item Name etc.
Though Show parent module, Display In Content Area properties are available but I could not see any effect of changing those properties.


Add new Seperator:

I have added new separator VINSeperatorExample to AccountsReceivable.FDDXXXExtension.


Though you can add the separator but it doesn't show up in UI.


Add new Menu Element Tile:

Ax 7 has new element called tiles. Example is CustomerInvoiceWorkSpaceTile

I have added new tile VINMenuElementTileExample to AccountsReceivable.FDDXXXExtension.

Add new Menu reference:

I have added new menu reference VINMenuReferenceExample to AccountsReceivable.FDDXXXExtension.


Following screenshot shows, how it looks in UI: